-
Creating multilingual website w/ React & Redux
Here is another post in series about React. This time I’m exploring Redux. I assume you know what Redux is already (otherwise, read redux.js.org to learn about it). If you haven’t read my blog post Creating multilingual website w/ React & Flux - I’d recommend you go through it, because I will be doing exactly the same thing here but using Redux instead of Flux.

My target
I want to create a simple multilingual website. I need to have:
- source structure and process suitable for mid-sized project
- fast update of UI on language change (desirably without page refresh)
- easy testable solution
- explore Redux
I’ll use ES6 where it is suitable, I automate dev process using Gulp.
Result
The main purpose of this project is to get my hands on Redux, thus the output is not that important, but you can check the result here. This is how it looks.
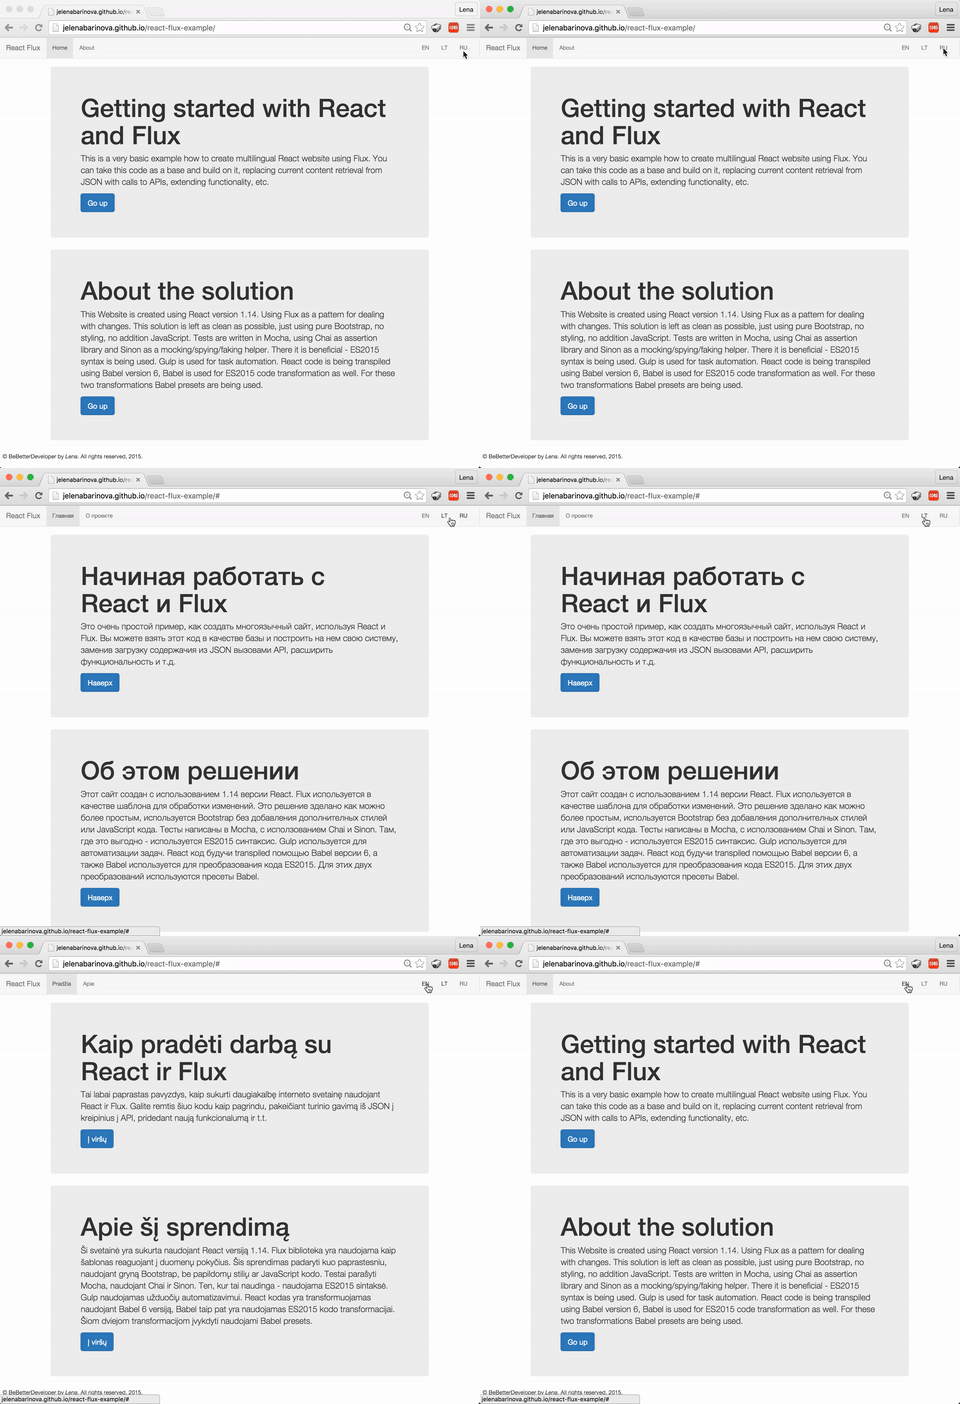
Two menus: left and right - left scrolls to different anchors in html, the right menu switches the language.
Working code in GitHub.
Clone & install
Just download the code and run from within react-redux-example directory
$npm installIf you are using Visual Studio Code - you can build it using
⇧⌘B(on Mac), otherwise use:$gulp buildIf you don not have Gulp installed on your machine, you should install it globally before moving forward:
$npm install gulp -gTo view a result on your local machine, just open index.html from react-redux-example/dist folder in a browser.
Code walk-through
Let me guide you through this example step by step. Here is a list of actions:
Step 1. Setting development environment
I use Visual Studio Code as my IDE. For development tasks such as run tests, build, deploy - I use gulp, you can check my tasks configuration in react-redux-example/gulpfile.js.
Step 2. Supportive functions
On my website I want to show the content in three languages. I have created data/content.json file to hold the text in structured form so I could manipulate it easily later. This is my simplified ‘database’.
To retrieve data from my ‘database’ (I mean from my json) I have created a fake API function in api.js. Later on I’ll just call my API to get data. It is as simple as this: This is the place you should put a call to your real API or database to retrieve your actual data.
Step 3. UI components
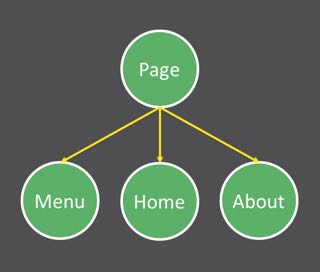
My UI consist of very few simple components: it’s a couple of containers to show text and a menu to navigate through that text as well as change the language of the text being shown.
For that I have created 4 React components: Menu, About, Home and Page. In the picture above, you can see my components tree.
Home and About components are only for information display purpose, they do not have any logic inside, they just get data through
propsand simply show it.This is how home.jsx looks like:
And here I have my about.jsx:
Menu component also gets content through
props, but in addition to that, it gets the function that should be called on language switch.To bring these components together I have a wrapper component Page. It’s job is to create Home, Menu and About and pass correct data to each of these components. Page itself gets all the content it shares to child components, through
propsas well. I’ll show code for the Page in Step 5. Redux.Step 4. Bringing it all together
So I have a very simple almost empty index.html with a placeholder
divpage defined, which later will hold my react component.Finally, I have a app.jsx file. The content of which I’m gonna explain in the next step (Step 5. Redux), since it involves Redux. Basically in this file I render my Page react component into my page
divand pass data to it.Step 5. Redux
After all preparations are done, we can move forward and start with Redux.
For Redux in this example I use two libraries: Redux and React-Redux. If you haven’t done it already - go ahead and install them:
$npm install redux react-redux --saveThis is what I want to achieve: when new language is selected in the Menu component, action is invoked and the state is changed (to hold a content in different language) and the new content from a state is being passed to Page and from there down to all children.
Here is how I would do that using Flux.
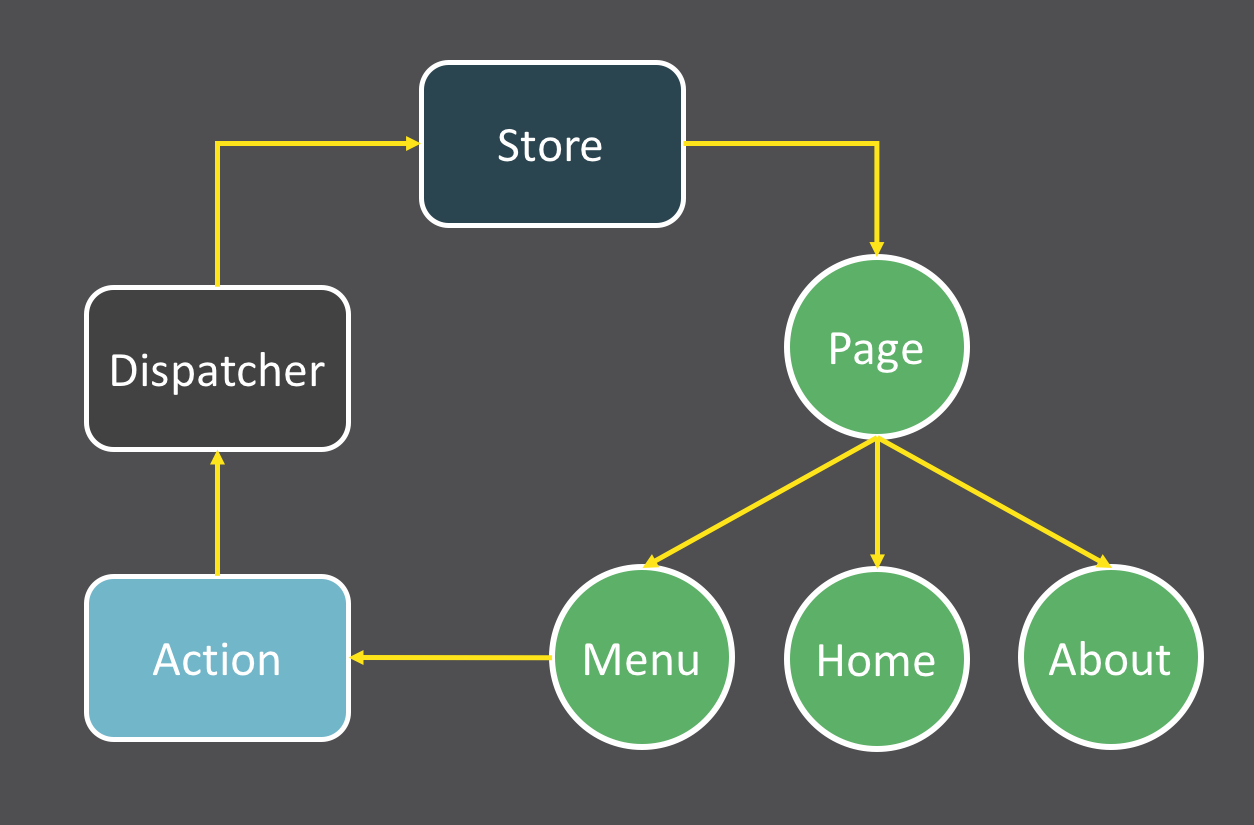
The flow looks similar when using Redux with some differences: Flux Store’s role is covered by Reducer, there is no Dispatcher and no support for multiple stores in Redux.
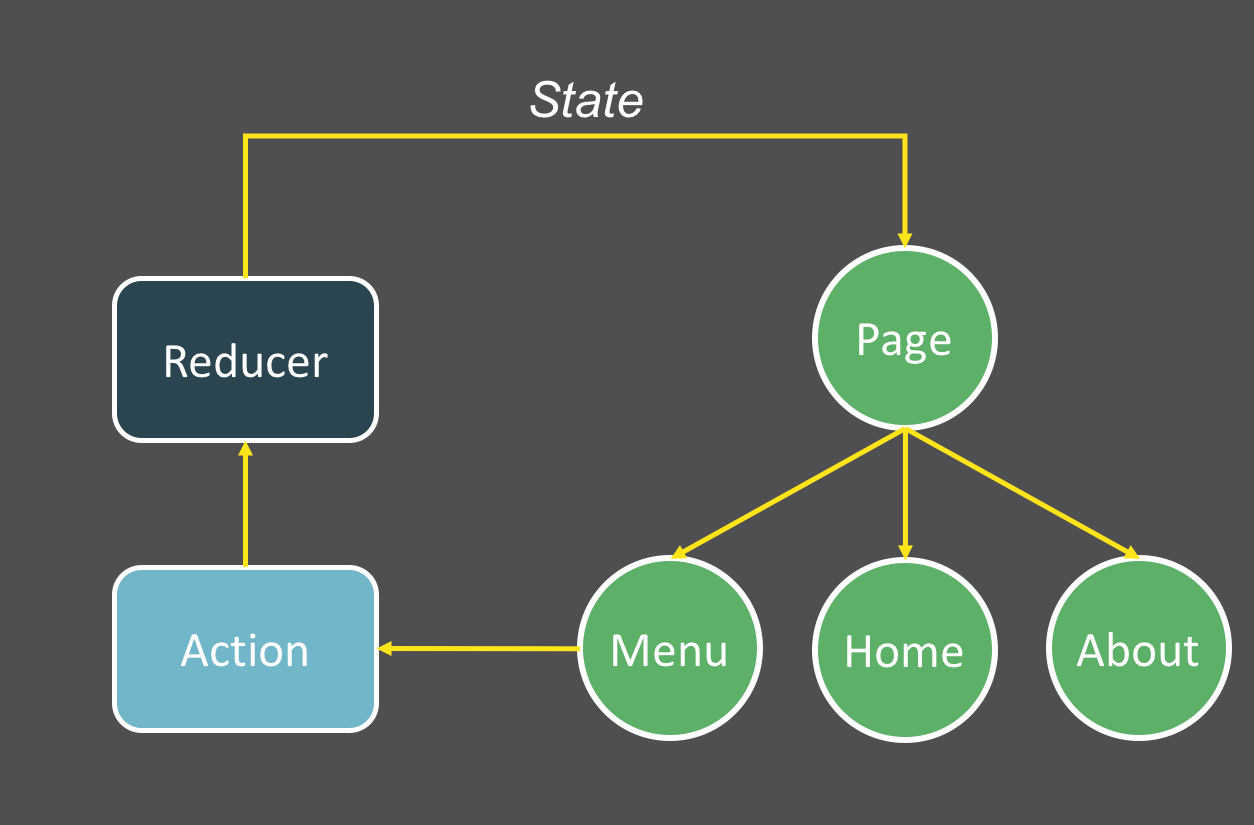
Let’s map this diagram items with my code.
In my actions.js file I have one action, named switchLanguage, it holds action_type and a property language (to pass the value of user’s selected language for the content to be shown):
And action_type is a simple constant defined in action_types.js file
Then, in reducer.js file I have defined initial state named initialState for my app - it holds a text in default language (English) retrieved from my database. And I have a function named reducer, that returns me a new state according to the given action. So if reducer is called with switchLanguage action as a parameter, it will return me the content of the page in a language provided as a property in action.
Now we have an initial state of the app, the description of state’s mutation (action) and a function to handle this mutation (reducer). Let’s move on to the presentation part.
As I mentioned before, I have app.jsx as an entry point of my app. If I were not using Redux, I would simply render my Page component into my
pagediv like this:Since I’m using Redux, I need to do a bit more here. First, I need to create complete state of my app (usually called store). For this I’m using Redux helper function createStore: it takes my reducer and returns me state (read Redux documentation for more about this function and Redux API). Second, I need to pass my store to my Page component. Here I’m using Provider from React-Redux module (for more on this topic read React-Redux documentation). Provider takes your app’s store and your components and passes store to those of components, that are ‘connected to store’ using connect() function (from React-Redux lib). Here is the code:
And the final part of this puzzle - Page component, which is ‘connected to store’ and gets the store from Provider.
Here is it’s code:
As you probably have noticed, in my app.jsx when creating Page component I do not pass any
propsto it, only to Provider, but inside the Page I refer toprops. This is enabled by React-Redux: from one side, in Page I have connected Page to store using connect() function, and in app.jsx I use Provider, which actually pass store to my Page.The trickiest part for me was the usage of connect(), it does both: makes your component subscribed to store updates and handles dispatching for provided function.
Literature
While exploring Redux and making my first Redux app work - I’ve read many blog posts, watched video tutorials and browsed many github repositories. Here is the list of resources, that I’ve found most useful:
- Video training on Redux by the author
- How to build a Todo app using React, Redux and Immutable.js
- Redux documentation
- React-Redux documentation
- Getting started with Redux
- A React-Redux example app
My earlier posts in React series:
-
Serverless system architecture using AWS, React and Node.js
This post is about my most recent freetime-killer “DIY project” - Price tracker, which has a beautiful serverless architecture that I want to share with all of your.
The story behind this app: I want to buy some items (such as skiing goggles, or new luggage set, or shoes), I want to get them for the best price and these items are not urgent for me so I can wait for a price drop. But I don’t want to hunt for sales and constantly check online stores for price decrease. I’ve got better things to do :)
So I’ve developed a system, which tracks price changes for my desirable products in online stores (which I trust to buy from) and notifies me over the email when price drops.
Architecture
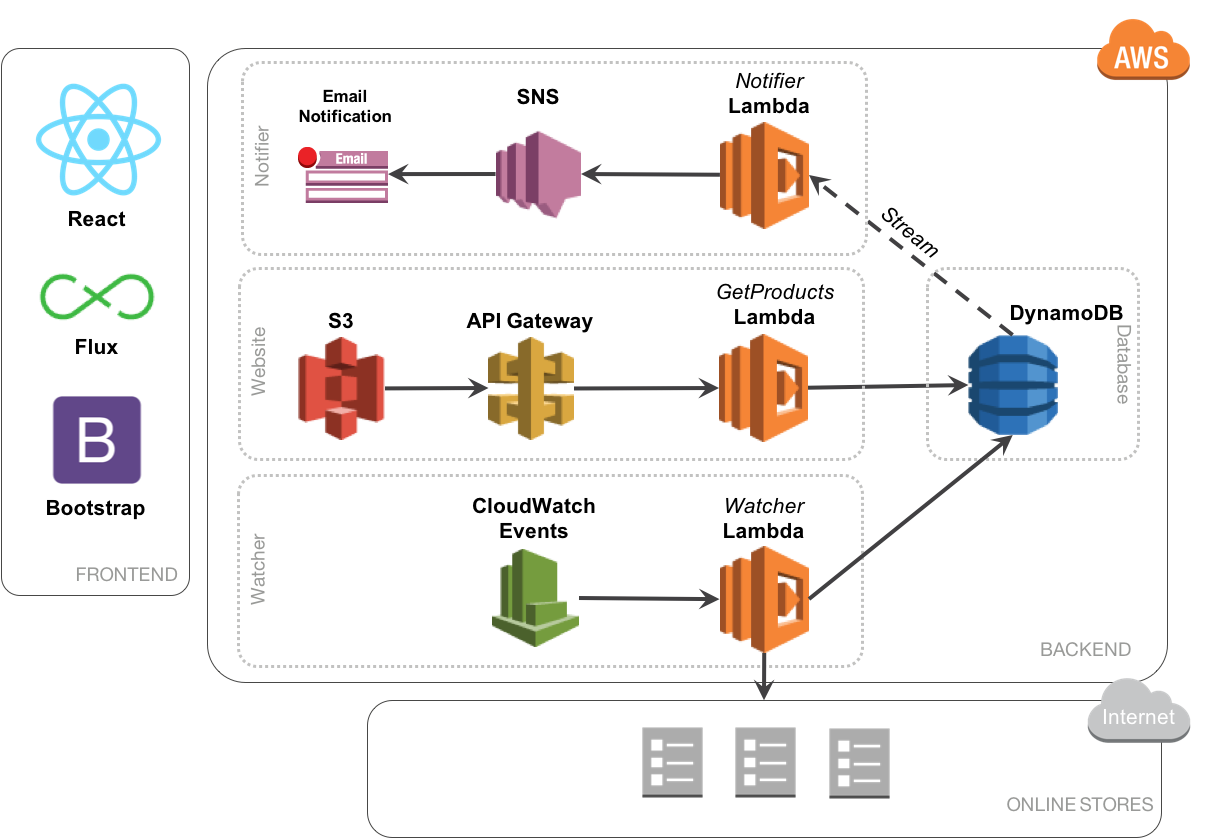
There are three major parts of the system:
- Website - to view the products and recent prices in different shops
- Watcher - a job scheduled to scrape online shops and track price changes every couple of hours
- Notifier - a job to watch changes to the price and notify me over the email when the price drops
In addition to these parts - there is a database to hold all my products, shops and price changes.
Technologies
In autumn 2015 I won a $100 AWS credit as a HackersRank prize in an algorithms coding contest and I decided to make a good use of it. So the platform of a choice to build this system is AWS. In addition to that, lately I am focused on everything JavaScript, thus the language of a choice is JavaScript: both for a frontend - React.js and backend - Node.js.
Here is the architecture:
Implementation
The sources are in Github at LenaBarinova/PriceTracker. Now shortly about how I implemented each of my three major system components.
Website
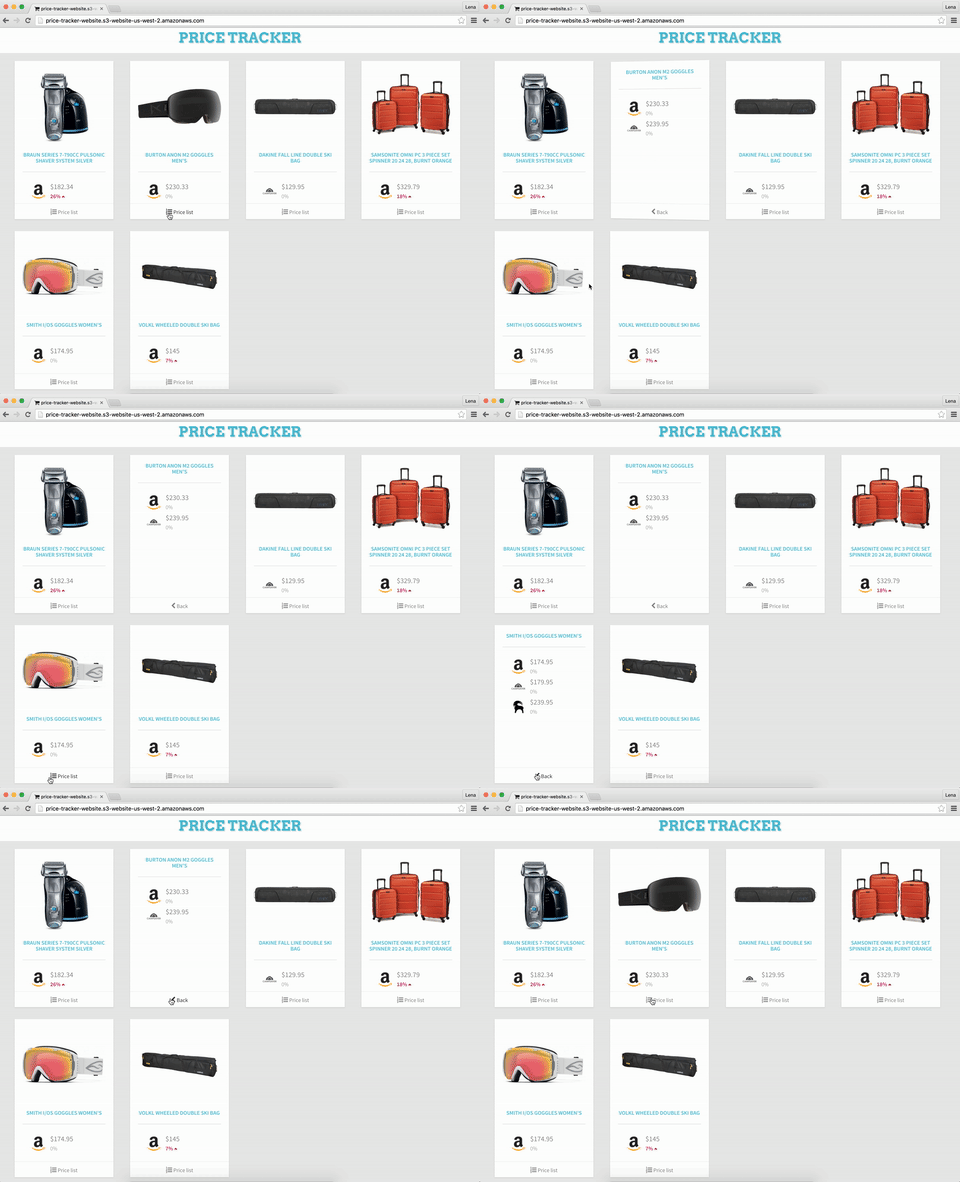
My Website - is a quite simple Single Page Application done in React using Flux pattern to handle UI changes. Website gets information about the products via a REST API implemented through AWS API Gateway, which calls AWS Lamdba function (written in Node.js) to actually get data from database. I use DynamoDB as a database, storing all of my products as JSON objects. UI is built using Bootstrap and some more advanced css styles to create flipping cards effects for products.
Here’s how it looks:
Tests for UI are written in Mocha. Website is hosted in Amazon S3. For deployment I use Gulp and many Gulp plugins to transpose, convert from ES6, concatenate and minify my JavaScript files, run tests, bundle all together and upload to S3 bucket.
Watcher
Watcher is AWS Lambda function implemented in Node.js. It queries a database, gets all the products and runs scrapers for each product to retrieve a new price from online stores. Scraper function is specific for each store, it loads shop’s html and gets/parses price fields using jQuery selectors. If there is change in price - product is updated with a new price and persisted to DynamoDB.
Watcher is scheduled to run every 4 hours using AWS CloudWatch Events.
Notifier
One more AWS Lambda function which listens to events in DynamoDB and if there is a price decrease - it sends email notification using AWS SNS service.
All AWS Lambda functions are written in JavaScript and tested using Mocha. Deployment is as easy as running “gulp deploy” task - it runs tests, gets all dependant node modules, zips all files together and uploads my JavaScript code to AWS as Lamdba functions.
Pros and Cons
Though it’s nice not to have a server and run everything on different services, and Lambda is a kind of magic, there are some drawbacks to it. In my case it’s perfect for Watcher and Notifier, but not that good for a data retrieval from DynamoDB. The problem is that in order to run Lambda function there is a lot of work done in the background (container creation, environment configuration, etc.) before actually running my function, that takes some time. When the task is a background job - it’s totally fine, but with UI - it gives me undesirable lag before loading my products for the first time. I don’t worry about it now, because I’m the only user of this system and visit this site once a week or so, but if someday there is more users than me, I’ll definitely look into it and refactor this part of the system.
Besides this small issue, everything else works as a charm. And with deployment automation - it is a real pleasure to work on this “project”.
Happy Architecting!
P.S.: If you want to hear more about any part of this system - just leave a comment. And if you by any chance would like to try PriceTracker yourself - let me know, I’d be happy to set up it for you.
-
Testing React components using Shallow Rendering
This is a continuation of Getting started w/ React & Mocha blog post. Here I’ll shortly describe one more alternative how to test a React component.

Set-up
Code for this example can be found on GitHub. After downloading the code, run
$npm installfollowed by
$npm testor this gulp command:
$gulp buildIf you are using Visual Studio Code - you can build it using
⇧⌘B(on Mac).Testing
So I have this react component, named VeryFirstDiv:
In my previous post to test it I was creating fake DOM using JSDOM library and then rendering my testable component into this fake DOM (Read more about it here).
This time I’ll only use React TestUtils add-on and rather new feature of it - Shallow Rendering.
Shallow rendering is an experimental feature that lets you render a component “one level deep” and assert facts about what its render method returns, without worrying about the behavior of child components, which are not instantiated or rendered. This does not require a DOM.
In my test I create an instance of Shallow Renderer:
let renderer = ReactTestUtils.createRenderer();Then, render my VeryFirstDiv component using this renderer
renderer.render(<VeryFirstDiv />);and get the output:
myDiv = renderer.getRenderOutput();At this point you can check anything you fancy. I’ll for example want to test whether it is of a type ‘div’ and does it have a class named “veryFirstDiv” Here’s my test:
For a comparison, I’ve created same test as in using DOM version:
Summary
Testing using Shallow Rendering is faster. You can even notice it on this small example: my test using fake DOM runs for ~50ms, while using Shallow Rendering test takes only 10ms. I believe the gain is even more significant on big projects. And as a pleasant side effect it doesn’t require additional libraries.
Happy Testing!