Creating multilingual website w/ React & Redux
Coding
Here is another post in series about React. This time I’m exploring Redux. I assume you know what Redux is already (otherwise, read redux.js.org to learn about it). If you haven’t read my blog post Creating multilingual website w/ React & Flux - I’d recommend you go through it, because I will be doing exactly the same thing here but using Redux instead of Flux.

My target
I want to create a simple multilingual website. I need to have:
- source structure and process suitable for mid-sized project
- fast update of UI on language change (desirably without page refresh)
- easy testable solution
- explore Redux
I’ll use ES6 where it is suitable, I automate dev process using Gulp.
Result
The main purpose of this project is to get my hands on Redux, thus the output is not that important, but you can check the result here. This is how it looks.
Two menus: left and right - left scrolls to different anchors in html, the right menu switches the language.
Working code in GitHub.
Clone & install
Just download the code and run from within react-redux-example directory
$npm install
If you are using Visual Studio Code - you can build it using ⇧⌘B (on Mac), otherwise use:
$gulp build
If you don not have Gulp installed on your machine, you should install it globally before moving forward:
$npm install gulp -g
To view a result on your local machine, just open index.html from react-redux-example/dist folder in a browser.
Code walk-through
Let me guide you through this example step by step. Here is a list of actions:
Step 1. Setting development environment
I use Visual Studio Code as my IDE. For development tasks such as run tests, build, deploy - I use gulp, you can check my tasks configuration in react-redux-example/gulpfile.js.
Step 2. Supportive functions
On my website I want to show the content in three languages. I have created data/content.json file to hold the text in structured form so I could manipulate it easily later. This is my simplified ‘database’.
To retrieve data from my ‘database’ (I mean from my json) I have created a fake API function in api.js. Later on I’ll just call my API to get data. It is as simple as this: This is the place you should put a call to your real API or database to retrieve your actual data.
Step 3. UI components
My UI consist of very few simple components: it’s a couple of containers to show text and a menu to navigate through that text as well as change the language of the text being shown.
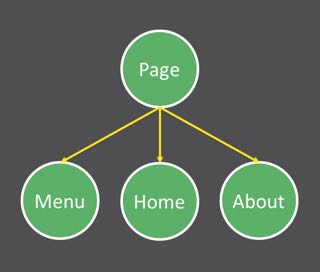
For that I have created 4 React components: Menu, About, Home and Page. In the picture above, you can see my components tree.
Home and About components are only for information display purpose, they do not have any logic inside, they just get data through props and simply show it.
This is how home.jsx looks like:
And here I have my about.jsx:
Menu component also gets content through props, but in addition to that, it gets the function that should be called on language switch.
To bring these components together I have a wrapper component Page. It’s job is to create Home, Menu and About and pass correct data to each of these components. Page itself gets all the content it shares to child components, through props as well. I’ll show code for the Page in Step 5. Redux.
Step 4. Bringing it all together
So I have a very simple almost empty index.html with a placeholder div page defined, which later will hold my react component.
Finally, I have a app.jsx file. The content of which I’m gonna explain in the next step (Step 5. Redux), since it involves Redux. Basically in this file I render my Page react component into my page div and pass data to it.
Step 5. Redux
After all preparations are done, we can move forward and start with Redux.
For Redux in this example I use two libraries: Redux and React-Redux. If you haven’t done it already - go ahead and install them:
$npm install redux react-redux --save
This is what I want to achieve: when new language is selected in the Menu component, action is invoked and the state is changed (to hold a content in different language) and the new content from a state is being passed to Page and from there down to all children.
Here is how I would do that using Flux.
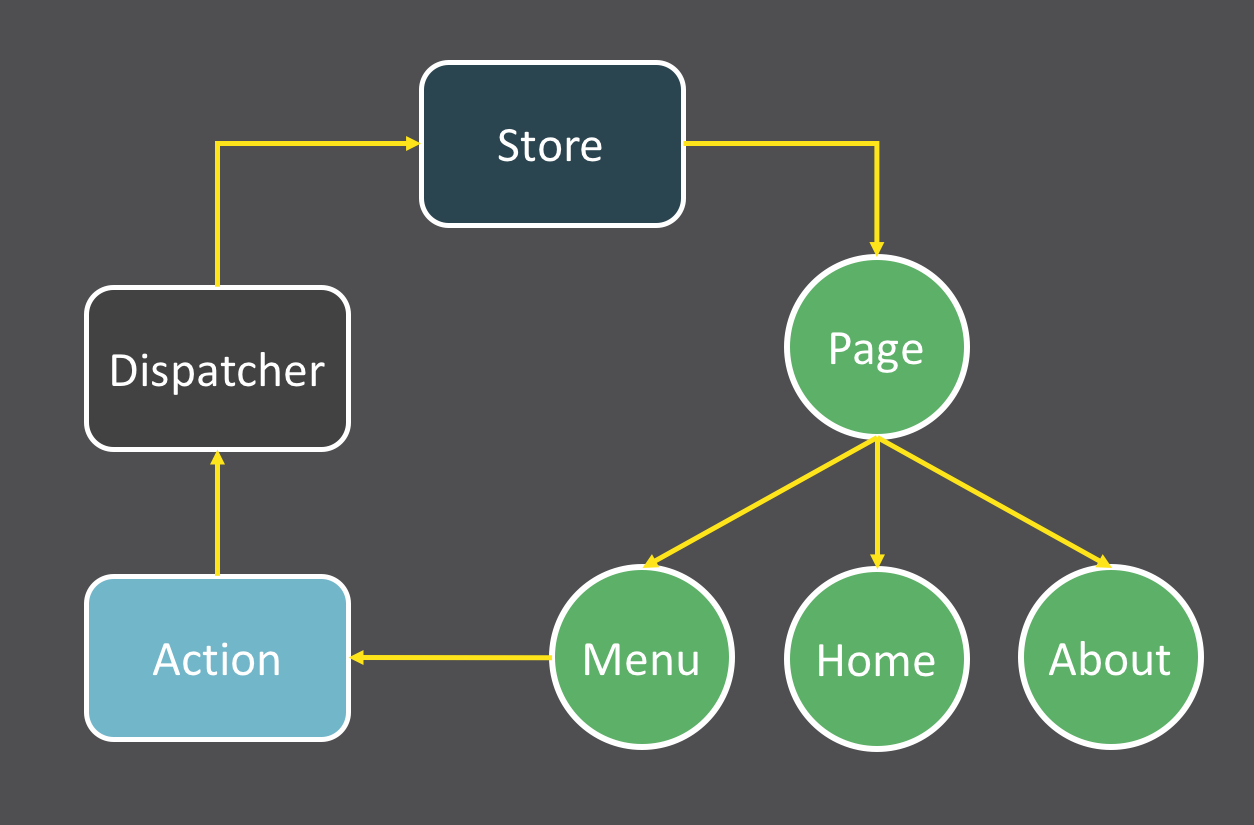
The flow looks similar when using Redux with some differences: Flux Store’s role is covered by Reducer, there is no Dispatcher and no support for multiple stores in Redux.
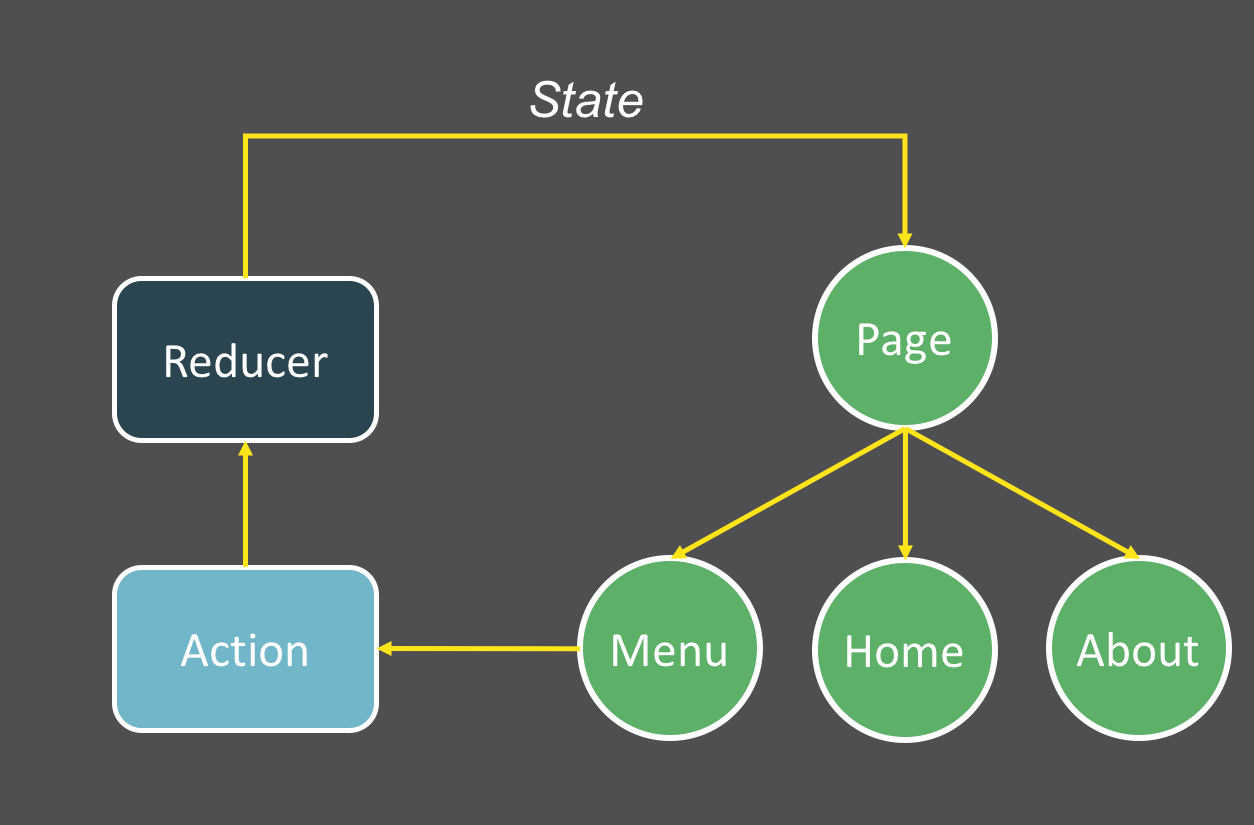
Let’s map this diagram items with my code.
In my actions.js file I have one action, named switchLanguage, it holds action_type and a property language (to pass the value of user’s selected language for the content to be shown):
And action_type is a simple constant defined in action_types.js file
Then, in reducer.js file I have defined initial state named initialState for my app - it holds a text in default language (English) retrieved from my database. And I have a function named reducer, that returns me a new state according to the given action. So if reducer is called with switchLanguage action as a parameter, it will return me the content of the page in a language provided as a property in action.
Now we have an initial state of the app, the description of state’s mutation (action) and a function to handle this mutation (reducer). Let’s move on to the presentation part.
As I mentioned before, I have app.jsx as an entry point of my app. If I were not using Redux, I would simply render my Page component into my page div like this:
Since I’m using Redux, I need to do a bit more here. First, I need to create complete state of my app (usually called store). For this I’m using Redux helper function createStore: it takes my reducer and returns me state (read Redux documentation for more about this function and Redux API). Second, I need to pass my store to my Page component. Here I’m using Provider from React-Redux module (for more on this topic read React-Redux documentation). Provider takes your app’s store and your components and passes store to those of components, that are ‘connected to store’ using connect() function (from React-Redux lib). Here is the code:
And the final part of this puzzle - Page component, which is ‘connected to store’ and gets the store from Provider.
Here is it’s code:
As you probably have noticed, in my app.jsx when creating Page component I do not pass any props to it, only to Provider, but inside the Page I refer to props. This is enabled by React-Redux: from one side, in Page I have connected Page to store using connect() function, and in app.jsx I use Provider, which actually pass store to my Page.
The trickiest part for me was the usage of connect(), it does both: makes your component subscribed to store updates and handles dispatching for provided function.
Literature
While exploring Redux and making my first Redux app work - I’ve read many blog posts, watched video tutorials and browsed many github repositories. Here is the list of resources, that I’ve found most useful:
- Video training on Redux by the author
- How to build a Todo app using React, Redux and Immutable.js
- Redux documentation
- React-Redux documentation
- Getting started with Redux
- A React-Redux example app
My earlier posts in React series: